Relative Layout | Android Developers
http://developer.android.com/intl/ja/resources/tutorials/views/hello-relativelayout.html
相対配置を行うレイアウトのようです。
それでは始めましょう。
プロジェクトを作成します。
HelloRelativeLayoutとします。
res/layout/main.xmlを開きます。
<?xml version="1.0" encoding="utf-8"?>
<LinearLayout xmlns:android="http://schemas.android.com/apk/res/android"
    android:layout_width="fill_parent"
    android:layout_height="fill_parent"
    android:orientation="vertical" >

    <TextView
        android:layout_width="fill_parent"
        android:layout_height="wrap_content"
        android:text="@string/hello" />

</LinearLayout>
以下のように変更します。
<?xml version="1.0" encoding="utf-8"?>
<RelativeLayout xmlns:android="http://schemas.android.com/apk/res/android"
    android:layout_width="fill_parent"
    android:layout_height="fill_parent">
    <TextView
        android:id="@+id/label"
        android:layout_width="fill_parent"
        android:layout_height="wrap_content"
        android:text="Type here:"/>
    <EditText
        android:id="@+id/entry"
        android:layout_width="fill_parent"
        android:layout_height="wrap_content"
        android:background="@android:drawable/editbox_background"
        android:layout_below="@id/label"/>
    <Button
        android:id="@+id/ok"
        android:layout_width="wrap_content"
        android:layout_height="wrap_content"
        android:layout_below="@id/entry"
        android:layout_alignParentRight="true"
        android:layout_marginLeft="10dip"
        android:text="OK" />
    <Button
        android:layout_width="wrap_content"
        android:layout_height="wrap_content"
        android:layout_toLeftOf="@id/ok"
        android:layout_alignTop="@id/ok"
        android:text="Cancel" />
</RelativeLayout>
実行します。
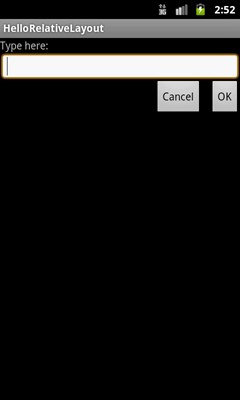
- RelativeLayou
相対配置を行うレイアウト
- android:id="@+id/xxx"
ウィジェットにIDを設定する。
- android:layout_below="@id/xxx"
指定した(xxx)IDを持つウィジェットの下と、このウィジェットの上をあせて配置。
@+id/entryのandroid:layout_belowは@id/labelなので、@id/labelの下と、@+id/entryの上をあわせて配置となる。
- android:layout_alignParentRight
親の右端に配置。
OKボタンの親、RelativeLayoutの右に配置となる。
- android:layout_marginLeft
左側のマージン
- android:layout_toLeftOf="@id/xxx"
xxxの左端とウィジェットの右端を合わるように配置。
Cancelボタンの左端と、OKボタンの右端を合わせて配置となる。
- android:layout_alignTop="@id/xxx"
xxxの上位置に合わせるように配置。
Cancelボタンの上と、OKボタンの上位置を合わせて配置となる。
0 件のコメント:
コメントを投稿