Tab Layout | Android Developers
http://developer.android.com/resources/tutorials/views/hello-tabwidget.html
そのまんまですね。それでは始めましょう。
プロジェクトHelloTabWidgetを作成します。
アクティビティ名はHelloTabWidgetActivityとします。
ふむふむ、タブ毎にクラスを作成するんですね。
1つ目のタブから作成しましょう。
新規にクラスファイルを作成します。
クラス名はArtistsActivityとします。
スーパークラスはActivityを指定します。
AlbumsActivity、SongsActivityも同様に作成します。
package com.blogspot.logroid.helloTabWidget;
import android.app.Activity;
import android.os.Bundle;
import android.widget.TextView;
public class ArtistsActivity extends Activity {
public void onCreate(Bundle savedInstanceState) {
super.onCreate(savedInstanceState);
TextView textview = new TextView(this);
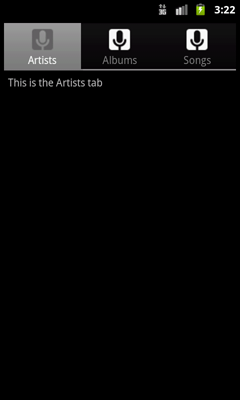
textview.setText("This is the Artists tab");
setContentView(textview);
}
}
package com.blogspot.logroid.helloTabWidget;
import android.app.Activity;
import android.os.Bundle;
import android.widget.TextView;
public class AlbumsActivity extends Activity {
public void onCreate(Bundle savedInstanceState) {
super.onCreate(savedInstanceState);
TextView textview = new TextView(this);
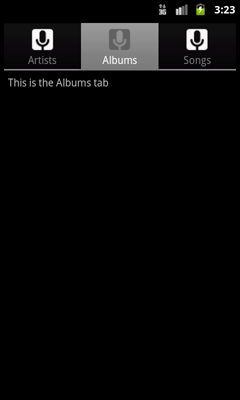
textview.setText("This is the Albums tab");
setContentView(textview);
}
}
package com.blogspot.logroid.helloTabWidget;

import android.app.Activity;
import android.os.Bundle;
import android.widget.TextView;

public class SongsActivity extends Activity {
    public void onCreate(Bundle savedInstanceState) {
        super.onCreate(savedInstanceState);

        TextView textview = new TextView(this);
        textview.setText("This is the Songs tab");
        setContentView(textview);
    }
}
AndroidManifest.xmlを開き、以下のように変更します。
<?xml version="1.0" encoding="utf-8"?>
<manifest xmlns:android="http://schemas.android.com/apk/res/android"
    package="com.blogspot.logroid.helloTabWidget"
    android:versionCode="1"
    android:versionName="1.0" >

    <uses-sdk android:minSdkVersion="10" />

    <application
        android:icon="@drawable/ic_launcher"
        android:label="@string/app_name" >
        <activity
            android:name=".HelloTabWidgetActivity"
            android:label="@string/app_name" >
            <intent-filter>
                <action android:name="android.intent.action.MAIN" />

                <category android:name="android.intent.category.LAUNCHER" />
            </intent-filter>
        </activity>
        <activity android:name="AlbumsActivity"></activity>
        <activity android:name="ArtistsActivity"></activity>
        <activity android:name="SongsActivity"></activity>
    </application>

</manifest>
チュートリアルページにあるアイコンをローカルに保存。タブに表示する画像を指定する状態リスト(Drawable)を作成します。
先ほど保存したしたアイコンをres/drawableに保存します。(res/drawableディレクトリが無い場合は作成します)
res/drawableにic_tab_artists.xmlという名前のxmlファイルを作成します。
ルート要素はselectorを選びます。
以下のように変更します。
<?xml version="1.0" encoding="utf-8"?>
<selector xmlns:android="http://schemas.android.com/apk/res/android" >
    <!-- When selected, use grey -->
    <item android:drawable="@drawable/ic_tab_artists_grey"
          android:state_selected="true" />
    <!-- When not selected, use white-->
    <item android:drawable="@drawable/ic_tab_artists_white" />
</selector>
res/layout/main.xmlを開き、以下のように変更します。
<?xml version="1.0" encoding="utf-8"?>
<TabHost xmlns:android="http://schemas.android.com/apk/res/android"
    android:id="@android:id/tabhost"
    android:layout_width="match_parent"
    android:layout_height="match_parent">
    <LinearLayout
        android:orientation="vertical"
        android:layout_width="match_parent"
        android:layout_height="match_parent"
        android:padding="5dp">
        <TabWidget
            android:id="@android:id/tabs"
            android:layout_width="match_parent"
            android:layout_height="wrap_content" />
        <FrameLayout
            android:id="@android:id/tabcontent"
            android:layout_width="match_parent"
            android:layout_height="match_parent"
            android:padding="5dp" />
    </LinearLayout>
</TabHost>
HelloTabWidgetActivityを以下のように変更します。
package com.blogspot.logroid.helloTabWidget;

import android.app.TabActivity;
import android.content.Intent;
import android.content.res.Resources;
import android.os.Bundle;
import android.widget.TabHost;

public class HelloTabWidgetActivity extends TabActivity {
 public void onCreate(Bundle savedInstanceState) {
  super.onCreate(savedInstanceState);
  setContentView(R.layout.main);

  Resources res = getResources(); // Resource object to get Drawables
  TabHost tabHost = getTabHost();  // The activity TabHost
  TabHost.TabSpec spec;  // Resusable TabSpec for each tab
  Intent intent;  // Reusable Intent for each tab

  // Create an Intent to launch an Activity for the tab (to be reused)
  intent = new Intent().setClass(this, ArtistsActivity.class);

  // Initialize a TabSpec for each tab and add it to the TabHost
  spec = tabHost.newTabSpec("artists").setIndicator("Artists",
    res.getDrawable(R.drawable.ic_tab_artists))
    .setContent(intent);
  tabHost.addTab(spec);

  // Do the same for the other tabs
  intent = new Intent().setClass(this, AlbumsActivity.class);
  spec = tabHost.newTabSpec("albums").setIndicator("Albums",
    res.getDrawable(R.drawable.ic_tab_albums))
    .setContent(intent);
  tabHost.addTab(spec);

  intent = new Intent().setClass(this, SongsActivity.class);
  spec = tabHost.newTabSpec("songs").setIndicator("Songs",
    res.getDrawable(R.drawable.ic_tab_songs))
    .setContent(intent);
  tabHost.addTab(spec);

  tabHost.setCurrentTab(2);
 }
}
AndroidManifest.xmlを開き、以下のように変更する
<?xml version="1.0" encoding="utf-8"?>
<manifest xmlns:android="http://schemas.android.com/apk/res/android"
    package="com.blogspot.logroid.helloTabWidget"
    android:versionCode="1"
    android:versionName="1.0" >

    <uses-sdk android:minSdkVersion="10" />

    <application
        android:icon="@drawable/ic_launcher"
        android:label="@string/app_name" >
        <activity
            android:name=".HelloTabWidgetActivity"
            android:label="@string/app_name"
            android:theme="@android:style/Theme.NoTitleBar">
            <intent-filter>
                <action android:name="android.intent.action.MAIN" />

                <category android:name="android.intent.category.LAUNCHER" />
            </intent-filter>
        </activity>
        <activity android:name="AlbumsActivity"></activity>
        <activity android:name="ArtistsActivity"></activity>
        <activity android:name="SongsActivity"></activity>
    </application>

</manifest>
実行します。
- drawable
状態リスト
コード内から呼ばれて、紐付いたリソースが使用される。
- TabHost
タブを格納するコンテナ。
中には、TabWidgetと、FrameLayoutが存在する必要がある。
- TabWidget
タブ部分
- FrameLayout
タブのコンテンツ部分
- TabActivity
タブを制御するためのアクティビティ
- getTabHost
TabHostを取得するメソッド
- TabHost.TabSpec
タブのプロパティを定義するクラス
- newTabSpec
引数に指定した文字に紐付くタブを認識させ、TabHost.TabSpecクラスのインスタンスを作成する
- setIndicator
タブに対して、テキストやアイコン画像を設定する
- setContent
タブの選択時に表示するビューをセットする
- addTab
TabHostに対し、タブを追加する
0 件のコメント:
コメントを投稿