Gallery | Android Developers
http://developer.android.com/intl/ja/resources/tutorials/views/hello-gallery.html
水平方向にスクロールしてビューを表示するレイアウトのようです。
今回は、写真のギャラリーを作成します。
HelloGalleryというプロジェクトを作成します。
チュートリアルのページから画像をダウンロードして、res/drawable/配下に保存します。
res/layout/main.xmlを開き、以下のように変更します。
<?xml version="1.0" encoding="utf-8"?>
<Gallery xmlns:android="http://schemas.android.com/apk/res/android"
    android:id="@+id/gallery"
    android:layout_width="match_parent"
    android:layout_height="wrap_content"
/>
HelloGalleryActivity.javaを開き、以下のように変更します。
package jp.blogspot.logroid.helloGallery;

import android.app.Activity;
import android.os.Bundle;
import android.view.View;
import android.widget.AdapterView;
import android.widget.AdapterView.OnItemClickListener;
import android.widget.Gallery;
import android.widget.Toast;

public class HelloGalleryActivity extends Activity {
    /** Called when the activity is first created. */
    @Override
    public void onCreate(Bundle savedInstanceState) {
        super.onCreate(savedInstanceState);
        setContentView(R.layout.main);

        Gallery gallery = (Gallery) findViewById(R.id.gallery);
        gallery.setAdapter(new ImageAdapter(this));

        gallery.setOnItemClickListener(new OnItemClickListener() {
            public void onItemClick(@SuppressWarnings("rawtypes") AdapterView parent, View v, int position, long id) {
                Toast.makeText(HelloGalleryActivity.this, "" + position, Toast.LENGTH_SHORT).show();
            }
        });
    }
}
res/values/にattrs.xmlを作成し、以下のように変更します。
<?xml version="1.0" encoding="utf-8"?>
<resources>
    <declare-styleable name="default_gallery">
        <attr name="android:galleryItemBackground" />
    </declare-styleable>
</resources>
HelloGalleryActivity.javaを開き、以下のように変更します。
package jp.blogspot.logroid.helloGallery;

import android.app.Activity;
import android.content.Context;
import android.content.res.TypedArray;
import android.os.Bundle;
import android.view.View;
import android.view.ViewGroup;
import android.widget.AdapterView;
import android.widget.AdapterView.OnItemClickListener;
import android.widget.BaseAdapter;
import android.widget.Gallery;
import android.widget.ImageView;
import android.widget.Toast;

public class HelloGalleryActivity extends Activity {
    /** Called when the activity is first created. */
    @Override
    public void onCreate(Bundle savedInstanceState) {
        super.onCreate(savedInstanceState);
        setContentView(R.layout.main);

        Gallery gallery = (Gallery) findViewById(R.id.gallery);
        gallery.setAdapter(new ImageAdapter(this));

        gallery.setOnItemClickListener(new OnItemClickListener() {
            public void onItemClick(@SuppressWarnings("rawtypes") AdapterView parent, View v, int position, long id) {
                Toast.makeText(HelloGalleryActivity.this, "" + position, Toast.LENGTH_SHORT).show();
            }
        });
    }

    public class ImageAdapter extends BaseAdapter {
        int mGalleryItemBackground;
        private Context mContext;

        private Integer[] mImageIds = {
                R.drawable.sample_1,
                R.drawable.sample_2,
                R.drawable.sample_3,
                R.drawable.sample_4,
                R.drawable.sample_5,
                R.drawable.sample_6,
                R.drawable.sample_7
        };

        public ImageAdapter(Context c) {
            mContext = c;
            TypedArray a = obtainStyledAttributes(R.styleable.default_gallery);
            mGalleryItemBackground = a.getResourceId(
                    R.styleable.default_gallery_android_galleryItemBackground, 0);
            a.recycle();
        }

        public int getCount() {
            return mImageIds.length;
        }

        public Object getItem(int position) {
            return position;
        }

        public long getItemId(int position) {
            return position;
        }

        public View getView(int position, View convertView, ViewGroup parent) {
            ImageView i = new ImageView(mContext);

            i.setImageResource(mImageIds[position]);
            i.setLayoutParams(new Gallery.LayoutParams(150, 100));
            i.setScaleType(ImageView.ScaleType.FIT_XY);
            i.setBackgroundResource(mGalleryItemBackground);

            return i;
        }
    }
}
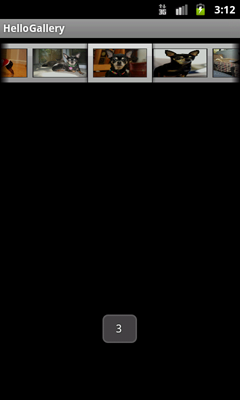
実行します。
- setImageResource
表示する画像のリソースIDを指定
リソースIDは、R.drawable.hogeで取得できる
- setBackgroundResource
背景として表示するリソースIDを指定
- obtainStyledAttributes
レイアウトスタイルを取得
- getResourceId
リソースIDの取得
- recycle
TypedArrayの破棄
0 件のコメント:
コメントを投稿