Linear Layout | Android Developers
http://developer.android.com/resources/tutorials/views/hello-linearlayout.html
どうやらレイアウトについてのチュートリアルのようです。
それでは始めましょう。
プロジェクトを作成します。
HelloLinearLayoutとします。
res/layout/main.xmlを開きます。
<?xml version="1.0" encoding="utf-8"?>
<LinearLayout xmlns:android="http://schemas.android.com/apk/res/android"
    android:layout_width="fill_parent"
    android:layout_height="fill_parent"
    android:orientation="vertical" >

    <TextView
        android:layout_width="fill_parent"
        android:layout_height="wrap_content"
        android:text="@string/hello" />

</LinearLayout>
以下のように変更します。
<?xml version="1.0" encoding="utf-8"?>
<LinearLayout xmlns:android="http://schemas.android.com/apk/res/android"
    android:orientation="vertical"
    android:layout_width="fill_parent"
    android:layout_height="fill_parent">

  <LinearLayout
      android:orientation="horizontal"
      android:layout_width="fill_parent"
      android:layout_height="fill_parent"
      android:layout_weight="1">
      <TextView
          android:text="red"
          android:gravity="center_horizontal"
          android:background="#aa0000"
          android:layout_width="wrap_content"
          android:layout_height="fill_parent"
          android:layout_weight="1"/>
      <TextView
          android:text="green"
          android:gravity="center_horizontal"
          android:background="#00aa00"
          android:layout_width="wrap_content"
          android:layout_height="fill_parent"
          android:layout_weight="1"/>
      <TextView
          android:text="blue"
          android:gravity="center_horizontal"
          android:background="#0000aa"
          android:layout_width="wrap_content"
          android:layout_height="fill_parent"
          android:layout_weight="1"/>
      <TextView
          android:text="yellow"
          android:gravity="center_horizontal"
          android:background="#aaaa00"
          android:layout_width="wrap_content"
          android:layout_height="fill_parent"
          android:layout_weight="1"/>
  </LinearLayout>

  <LinearLayout
    android:orientation="vertical"
    android:layout_width="fill_parent"
    android:layout_height="fill_parent"
    android:layout_weight="1">
    <TextView
        android:text="row one"
        android:textSize="15pt"
        android:layout_width="fill_parent"
        android:layout_height="wrap_content"
        android:layout_weight="1"/>
    <TextView
        android:text="row two"
        android:textSize="15pt"
        android:layout_width="fill_parent"
        android:layout_height="wrap_content"
        android:layout_weight="1"/>
    <TextView
        android:text="row three"
        android:textSize="15pt"
        android:layout_width="fill_parent"
        android:layout_height="wrap_content"
        android:layout_weight="1"/>
    <TextView
        android:text="row four"
        android:textSize="15pt"
        android:layout_width="fill_parent"
        android:layout_height="wrap_content"
        android:layout_weight="1"/>
  </LinearLayout>

</LinearLayout>
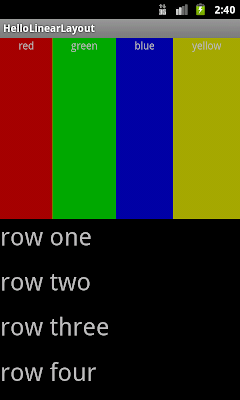
実行します。
今回出てきた用語について解説。
- LinearLayout
縦横に、配置するレイアウト
- android:orientation
配置する向き
- android:layout_width
レイアウトの幅
- android:layout_height
レイアウトの高さ
- android:layout_weight
オブジェクトの占有比率
- android:gravity
オブジェクトの配置方法
- fill_parent
画面サイズにピッタリ合わせる
現在は match_parent が推奨となっているようです
- wrap_content
文字列の長さに合わせる
間違いがあれば指摘ください。
0 件のコメント:
コメントを投稿